
Why Your Whirlpool Dryer Is Not Starting
If your Whirlpool dryer is not starting, begin with the simple checks: make sure the door latches fully, turn off Control Lock, select a drying cycle, and hold Start for 2 to 5 seconds with dry hands. Then reset the dryer breaker by switching it fully off and back on. Electric dryers can still light up or show a display when one side of the 240-volt breaker has tripped.
If those steps do not work, the likely issue is a failed door switch, blown thermal fuse, broken belt, faulty start switch, or control board problem. Unplug the dryer before removing panels or testing parts. A thermal fuse that has opened often points to a clogged vent, so replacing the fuse without clearing the airflow problem can lead to another failure.
I am Vasyl Turetsky, Founder and Appliance Repair Specialist at iFix Appliances. I help Raleigh-area homeowners diagnose Whirlpool dryer not starting problems, from basic control and power issues to failed safety switches, fuses, motors, and electronic controls.

Quick External and User Interface Checks

Before taking out screwdrivers or moving your appliance away from the wall, start with simple user-interface settings. Modern appliances rely heavily on electronic sensors that can prevent a cycle from starting if basic operational criteria are not met. Reviewing the official Whirlpool dryer operating guide reveals that many startup complaints stem from basic interface misunderstandings rather than damaged internal components.
First, check the Control Lock (or Child Lock) status light. When enabled, this feature locks the console to prevent accidental cycle starts or setting adjustments. If the lock icon is illuminated, press and hold the Cycle Signal button (or the button labeled with a key/lock icon) for a full 3 seconds until the light turns off and the unit chimes.
Next, examine how you interact with the control panel:
- Button Hold Duration: Unlike simple light switches, the Start, Push to Start, or Hold to Start button on a Whirlpool dryer requires you to press and hold firmly for 2 to 5 seconds to allow the drive motor to engage. A quick tap often does nothing.
- Moisture and Fingertip Contact: Capacitive touch panels operate similarly to smartphone screens. If your hands are wet from handling freshly washed laundry, or if condensation rests on the glass console, touch inputs will not register. Wipe the panel and dry your hands completely, then press the buttons using the fleshy pad of your fingertip rather than your fingernail.
- Cycle Selection: Ensure the cycle selector is pointed to an active drying cycle such as Timed Dry or Normal/Automatic. Selecting auxiliary settings like Wrinkle Reduction or Damp Dry on some older rotary models may prevent the machine from starting if a primary cycle is not activated first.
How to Reset a Whirlpool Dryer Not Starting
When electronic control boards freeze due to minor power fluctuations or rapid button inputs, performing a hard reset clears the memory and discharges residual energy stored in the circuit capacitors.
To reset the machine:
- Unplug the dryer’s heavy-duty power cord from the electrical wall receptacle. If accessing the plug is difficult, switch off the dedicated circuit breaker in your home electrical panel.
- Leave the power disconnected for a full 60 seconds.
- While the dryer remains unpowered, press and hold the Power or Start button for 5 seconds to drain any remaining charge in the control board.
- Restore power to the dryer.
- Open and firmly shut the dryer door, select a regular Timed Dry cycle, and hold the Start button down for 3 seconds.
If you encounter physical console damage—such as cracked plastic shafts behind the control dials—our guide on what to do when your dryer knob falls off explains how to restore proper mechanical engagement. Knowing how to fix a dryer step-by-step saves time and prevents misdiagnosing a simple electronic freeze.
Inspecting Power Supply and Circuit Breakers
A complete lack of power or an unresponsive control panel often traces back to the household breaker box. Electric clothes dryers require a dedicated 240-volt electrical supply delivered across two separate 120-volt lines through a double-pole breaker. Gas dryers operate on a standard 120-volt single-pole circuit.
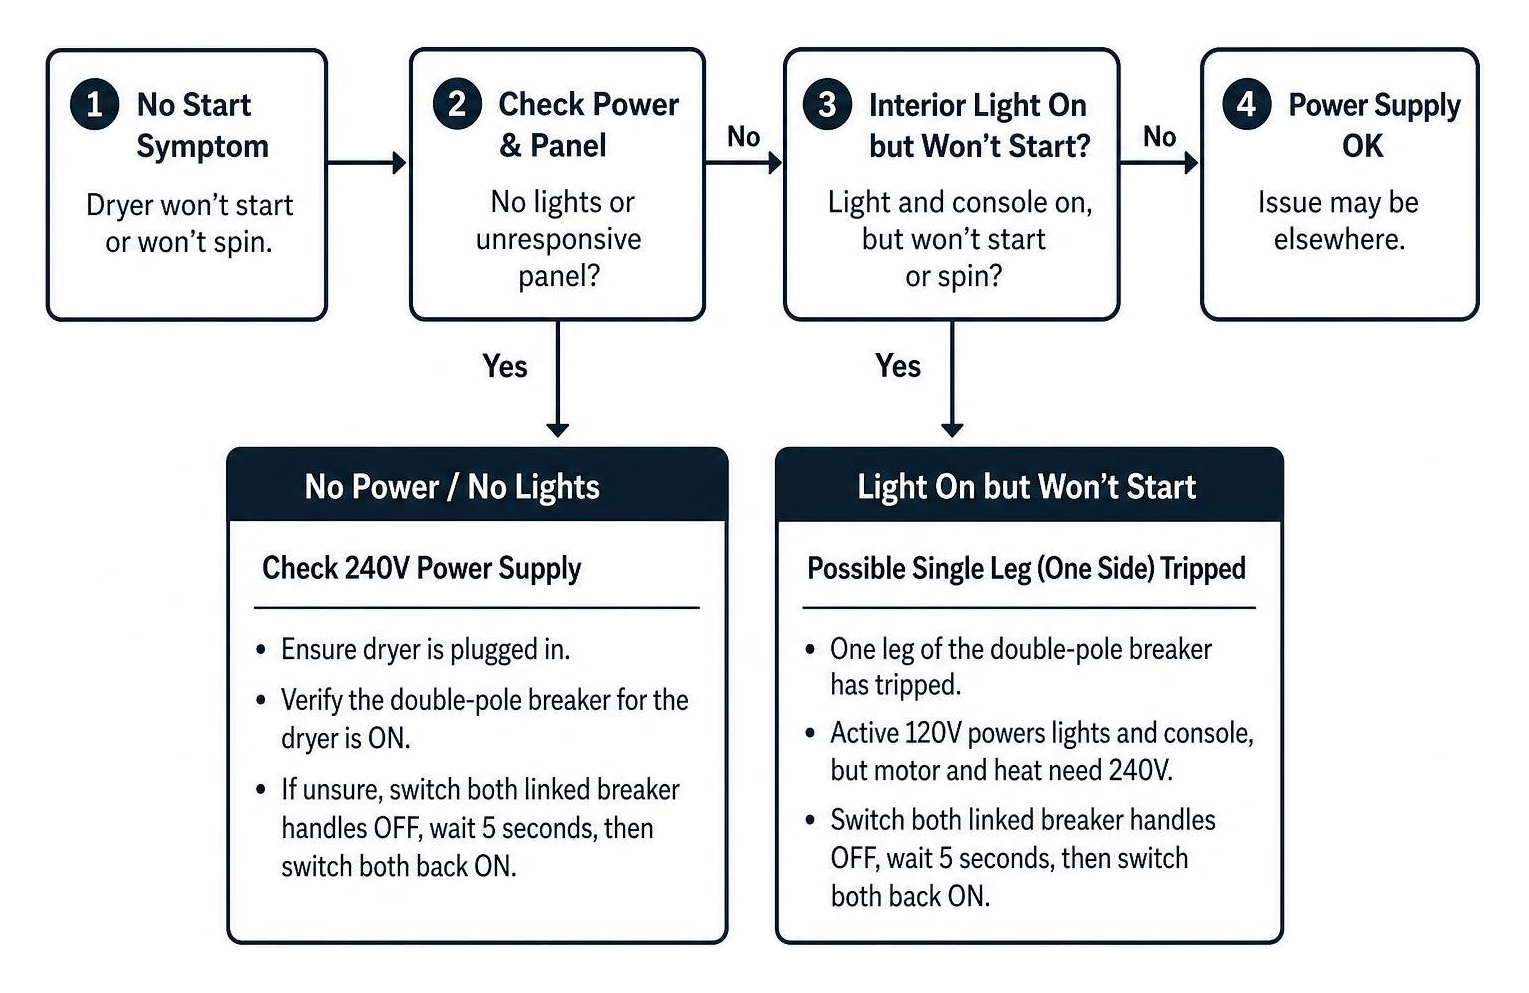
A frequent scenario involves an electric dryer that turns on its interior drum light and illuminates console indicators, yet refuses to spin or start when pressing the Start button. This happens when one leg of the double-pole breaker trips. The active 120V leg powers the low-voltage electronics and light bulb, but the missing 120V leg prevents the 240V drive motor and heating circuit from operating.
To resolve this:
- Locate the dryer breakers in your service panel.
- Even if the switch does not appear tripped, flip both linked switches completely to the OFF position, wait 5 seconds, and firmly switch them back to the ON position.
- If your home uses a traditional fuse box, inspect both cartridge or screw-in fuses and replace any blown units.
- Inspect the terminal block on the back of the dryer where the power cord connects. Look for burnt terminal lugs, melted plastic casing, or loose screw terminals that interrupt voltage delivery.
Primary Culprits Behind a Whirlpool Dryer Not Starting
When external settings and household electrical feeds are working properly, internal component failures account for the remainder of startup issues. Decades of field diagnostic data highlight clear statistical trends behind these breakdowns:
| Potential Fault | Failure Probability | Primary Symptoms | Difficulty to Repair |
|---|---|---|---|
| Door Switch / Latch | 40% | Drum light stays on when door closes; no motor response; no click sound | Easy (Beginner) |
| Blown Thermal Fuse | 24% | Console lights up fully, but unit remains silent; drum does not turn | Easy (Beginner) |
| Control Board Failure | 14% | Unresponsive display, random error codes, no relay click heard | Moderate |
| Child / Control Lock | 12% | Padlock icon illuminated; console beeps but will not initiate cycle | User Setting |
| Broken Start Button | 10% | Button feels mushy or loose; no audible click when depressed | Moderate |
Testing the Door Switch and Latch Assembly
Accounting for 40% of all startup failures, the door switch acts as an essential safety interlock. If the control board or motor circuit does not receive a closed electrical signal confirming the door is completely shut, the dryer will not start.
Many Whirlpool models feature dual catch latches at the top and bottom of the frame. First, check that bulky items—such as heavy blankets or jacket zippers—are not caught in the perimeter seal, preventing the door from fully latching.
To test the door switch mechanically and electrically:
- Open the door and locate the small plastic switch actuator along the door frame.
- Manually press the switch lever inward with your finger. You should hear a distinct, crisp mechanical click. If the lever feels spongy, sticks, or does not click, the internal spring mechanism has failed.
- On models equipped with an internal drum light, observe the bulb while pressing the switch. The light should turn off immediately when the switch is compressed. If the light stays illuminated, the switch is defective.
- To confirm electrically, unplug the dryer, lift the top console panel, and disconnect the wire harness from the switch terminals. Place your digital multimeter probes across the outer terminals and select the lowest resistance (ohms) setting. The meter should read infinite resistance (OL) with the switch released and drop to 0.00 to 0.02 ohms when the actuator is pressed. Replace the switch if it shows open continuity while compressed.
Inspecting and Testing the Thermal Fuse
Tripped electrical breakers and blown thermal safety fuses account for 24% of startup failures. The thermal fuse is a non-resettable, single-use safety device mounted directly on the blower wheel housing or burner chute. It permanently cuts power to the drive circuit when exhaust airflow temperatures exceed safe operating limits.
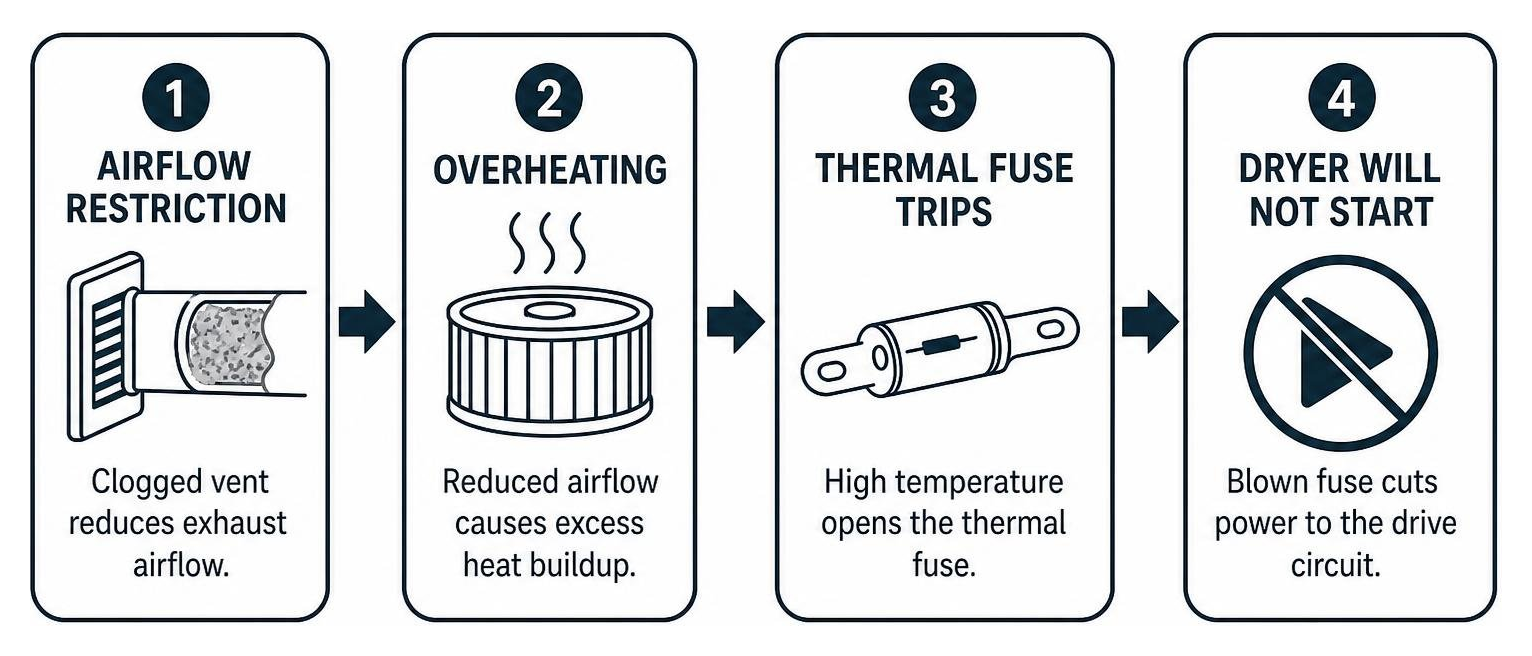
When an internal fuse opens, a dryer will exhibit power to the digital display but will not run when you press Start. A blown fuse indicates poor exhaust airflow. Installing a replacement fuse without cleaning your exhaust vent line will cause the new fuse to blow during the very next load. If your machine struggles with heat regulation or drum operation, our guide on a dryer not heating or spinning covers these airflow-related failures in detail.
To test the thermal fuse:
- Unplug the dryer from the electrical wall receptacle.
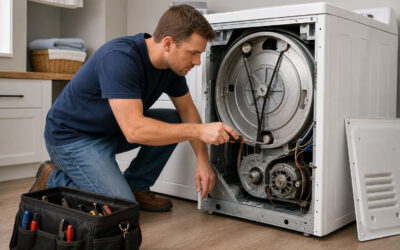
- Pull the unit forward and use a 1/4-inch hex nut driver to remove the 8 to 10 screws securing the rear metal access panel.
- Locate the white plastic oblong component with two wire leads mounted on the blower housing.
- Slip at least one wire connector off the terminal to isolate the part from parallel circuits.
- Touch your multimeter probes to the two metal terminals:
- Functional Fuse: The meter will read between 0.00 and 0.05 ohms (indicating closed continuity).
- Blown Fuse: The meter will show OL (Open Line / Infinite Resistance). A blown fuse must be replaced.
Step-by-Step Mechanical and Electrical Diagnostics

If your door switch and thermal fuse pass electrical continuity checks, you will need to inspect internal drive parts and motor windings using a structured troubleshooting sequence. For deeper step-by-step teardowns, consult the dryer troubleshooting guide from iFixit.
Always follow strict electrical safety practices: never test internal wiring with the power connected, keep your hardware organized in small containers, and label wire leads before disconnecting them.
Testing Components for a Whirlpool Dryer Not Starting
When a dryer receives power but fails to turn over, two common electrical culprits are the push-to-start switch and the main drive motor:
- Push-to-Start Switch: On rotary-dial models, the start switch sends momentary power to the motor start windings. To test it, open the top console, detach the wiring leads from the switch, and measure resistance across the terminals while pressing the button. It should read infinite ohms at rest and drop to 0 ohms when fully depressed.
- Drive Motor Windings: If the motor hums loudly when you press start but fails to spin the drum, the start winding or internal centrifugal switch may have failed. If you hear your dryer drum just humming, the motor cannot generate sufficient starting torque.
- Motor Continuity Test: With the front panel removed and power disconnected, detach the wire harness connector from the motor. Test across the run and start terminals with your multimeter. A healthy Whirlpool motor typically exhibits resistance readings between 2.4 and 3.8 ohms. Readings showing zero or infinite resistance indicate burnt motor windings that require a full motor replacement.
Inspecting the Drive Belt and Idler Pulley Switch
Whirlpool dryers use a heavy-duty rubber belt looped around the exterior circumference of the drum, routed through a spring-loaded idler pulley arm, and connected to the motor drive spindle.
To check the drive belt:
- Reach into the dryer and attempt to spin the empty drum manually by hand. If the drum spins freely with zero resistance, the drive belt has snapped or slipped off its track.
- Many modern Whirlpool platforms incorporate a mechanical broken belt switch located adjacent to the idler pulley bracket. If the belt breaks, the spring-loaded tensioner arm drops downward and trips this safety switch, cutting all power to the motor.
- While inspecting the belt, check the support rollers, drum glide pads, and drum felt seals. Worn felt seals allow ambient room air to bypass the drum, leading to overheating. Following our guide on how to replace a dryer drum felt seal ensures your airflow remains properly sealed.
Repair Costs, DIY Feasibility, and When to Call a Pro
Whirlpool dryers are designed with accessible cabinets utilizing standard 1/4-inch hex screws and snap clips, making them among the most DIY-friendly appliances on the market. Deciding whether to repair the unit yourself or hire a factory-trained technician depends on component costs, technical comfort, and appliance age.
Understanding why ignoring dryer problems can cost you more helps avoid secondary failures, such as melted blower wheels or burnt wiring harnesses.
| Repair Type | DIY Parts Cost | Professional Service Cost | Time Required | Recommended Action |
|---|---|---|---|---|
| Door Switch Replacement | $12 – $25 | $130 – $200 | 20 – 40 min | DIY friendly |
| Thermal Fuse Replacement | $10 – $20 | $130 – $190 | 30 – 45 min | DIY friendly (+ clean vent) |
| Drive Belt & Pulley Kit | $20 – $45 | $150 – $240 | 45 – 75 min | DIY or Professional |
| Main Control Board | $180 – $350 | $280 – $460 | 30 – 60 min | Professional recommended |
| Drive Motor Assembly | $110 – $220 | $260 – $420 | 60 – 90 min | Professional recommended |
The Repair vs. Replace Rule
If your dryer is under 8 to 10 years old, repairing components like door switches, thermal fuses, drive belts, and control boards is cost-effective. High-quality replacement parts restore reliable performance for years.
However, if your appliance is over 12 years old and experiences simultaneous motor and electronic control board failures, investing in a new energy-efficient dryer is often the better long-term choice. When troubleshooting complex electrical faults or control board shorts, scheduling a dedicated Whirlpool repair service ensures accurate diagnosis and factory-grade repairs.
Frequently Asked Questions About Whirlpool Dryer Startup Issues
Why does my Whirlpool dryer have power and lights but won’t start?
This issue typically points to a blown thermal fuse, an open door safety switch, or a partially tripped 240V double-pole circuit breaker. When one side of a 240V breaker trips, the single active 120V line keeps the console displays and drum lights illuminated, but the unit lacks the secondary voltage supply required to start the drive motor. Additionally, confirm that the Control Lock indicator light is not turned on.
How do I know if the thermal fuse is blown on my Whirlpool dryer?
To verify if a thermal fuse is blown, unplug the dryer, remove the rear service panel, and locate the white plastic fuse mounted on the blower housing. Disconnect the wire leads and touch digital multimeter probes to both terminal posts while set to the ohms/continuity setting. A functioning fuse measures near 0 ohms, whereas a blown fuse displays OL (infinite resistance).
Is it worth repairing a Whirlpool dryer that won’t start?
Yes. The most common reasons a Whirlpool dryer refuses to start—such as defective door switches, blown thermal fuses, and broken drive belts—are inexpensive to repair. If your dryer is under 10 years old, replacing these wear items is significantly more cost-effective than buying a new appliance. If you need assistance, our technicians provide complete dryer repair throughout the Triangle area.
Conclusion
A dryer that refuses to start can disrupt your household routine, but finding the root cause follows a straightforward diagnostic process. Start with simple external checks: unlock the console controls, ensure your hands are dry when pressing touchpads, confirm door latch alignment, and reset your double-pole circuit breakers.
When external settings are confirmed, use a basic digital multimeter to test the door interlock switch, thermal safety fuse, and drive motor windings. Thermal safety devices blow for a reason; always inspect and clear your exterior vent duct of lint buildup whenever replacing a thermal fuse.
If you prefer to have an experienced local specialist handle the diagnostic testing and component replacement, our team at iFix Appliances is here to help. We deliver dependable, long-term professional appliance repair across Raleigh, Cary, Apex, Garner, Durham, Morrisville, Wake Forest, and surrounding communities. Have questions about your appliance or ready to book a service visit? Contact us today to get your laundry routine running smoothly again.
0 Comments