
Fix Fridge Noise Fast: Start With the Sound Source
Most fridge noise repair starts with three simple checks: find where the sound comes from, remove basic causes of vibration or blockage, and stop before touching sealed-system parts.
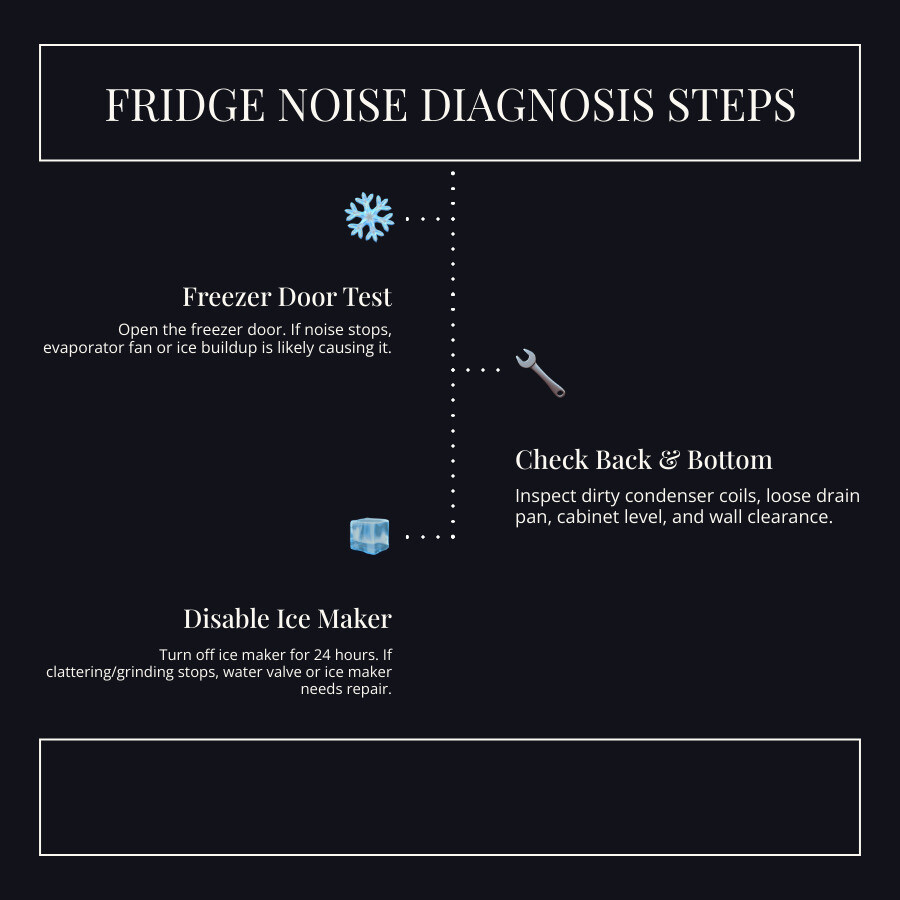
- Listen with the freezer door open and closed. If the noise stops when the door opens, the evaporator fan or ice around it is a likely cause.
- Check the back and bottom of the refrigerator. Clean dusty condenser coils, look for a loose drain pan, and make sure the unit is level and not touching the wall.
- Turn off the ice maker for a day. If clattering, buzzing, or grinding stops, the ice maker, water valve, or water supply may need attention.
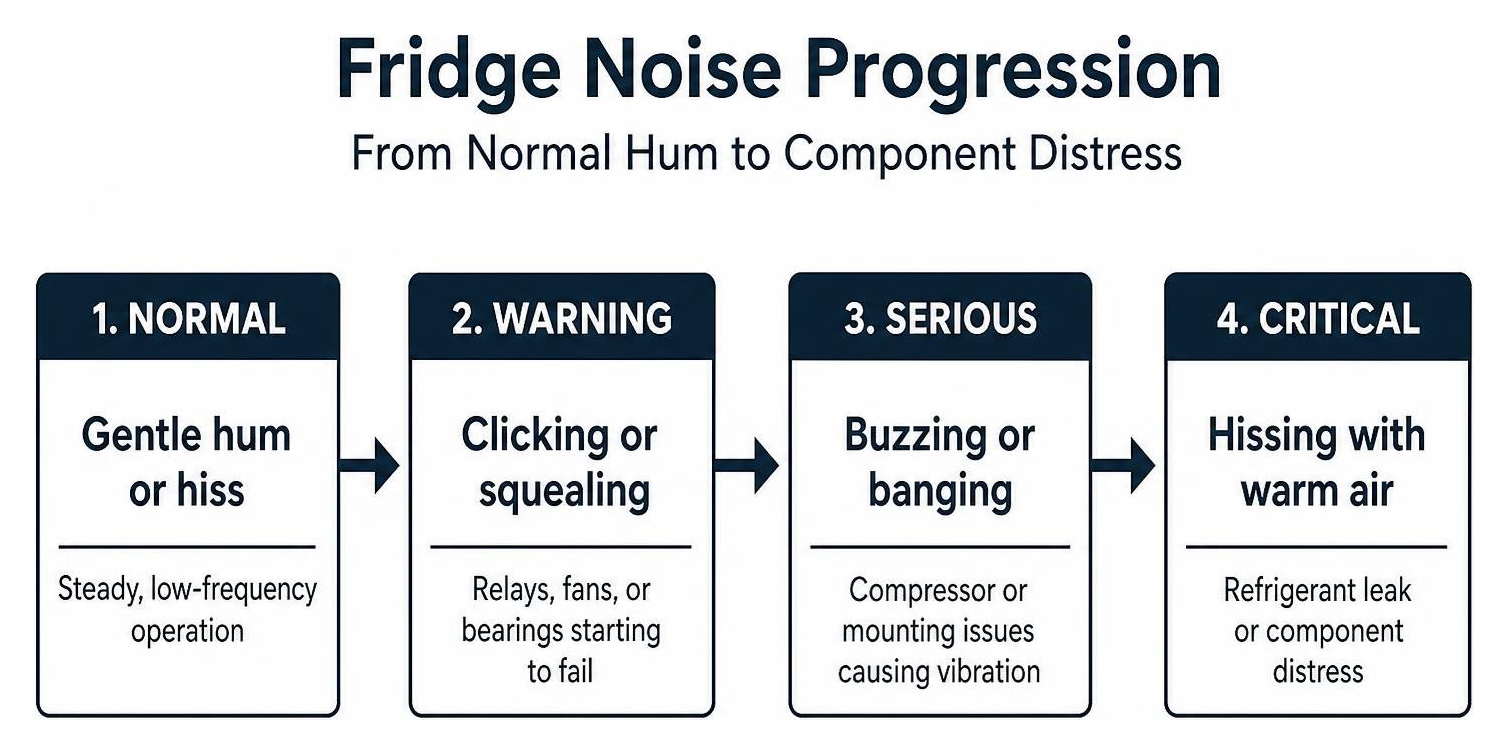
A steady hum, occasional gurgle, or light popping during a defrost cycle is often normal. Loud scraping, squealing, repeated clicking, or a buzz paired with weak cooling is not. Ice can rub against an evaporator fan blade, a dirty condenser area can make the system work harder, and an uneven cabinet can turn normal operation into a constant rattle.
I am Vasyl Turetsky, Founder and Appliance Repair Specialist at iFix Appliances. I help homeowners across the Raleigh area diagnose fridge noise repair problems, from fan and ice-maker sounds to compressor-related issues, so they can choose the safest next step.
Decoding Common Refrigerator Sounds and What They Mean
Every refrigerator produces a subtle baseline of acoustic feedback during its standard operational cycling. Refrigerant moves through tiny capillary tubes, causing a gentle gurgling or bubbling sound as it shifts between liquid and vapor states. Modern inverter compressors hum steadily as they modulate motor speeds to preserve energy. Plastic internal liners expand and contract as temperatures swing between freezing cycles and automated defrost routines, causing occasional snaps or pops.
When an acoustic pattern shifts from a gentle background whisper to an aggressive racket, mechanical distress is usually the culprit. Recognizing the type of noise your unit makes is the fastest way to evaluate urgency and plan a repair.
| Noise Description | Likely Source / Cause | Urgency Level | Recommended Action |
|---|---|---|---|
| High-Pitched Squeal / Chirp | Evaporator fan motor bearings drying out | Moderate | Inspect fan blades; replace motor if shaft has play |
| Loud Scraping / Flapping | Fan blades hitting frost or ice buildup | Moderate | Perform manual defrost; inspect defrost circuit |
| Vibrating / Rattling Base | Unlevel cabinet or loose drain pan | Low | Level front legs; snap drain pan securely into bracket |
| Rapid Clicking (Every 2–5 Min) | Defective compressor start relay / Overload | High | Test/replace start relay; inspect compressor windings |
| Deep Buzzing / Humming | Dust-choked coils or failing condenser fan | Moderate | Clean coils; vacuum rear compartment; check fan |
| Loud Banging on Shutdown | Loose internal compressor spring mounts | High | Professional compressor evaluation required |
| High Hissing with Warm Air | Refrigerant leak in sealed system | Critical | Professional EPA-certified service required |
High-Pitched Squealing or Scraping Fan Sounds
A sharp squeal or high-frequency chirping sound inside the freezer compartment almost always traces back to the evaporator fan assembly. This motor operates continuously to push cold air across the cooling coils and distribute it throughout the fresh food and freezer sections.
Over years of continuous operation, the factory lubrication inside the motor bearings dries out. When bearings wear down, the motor shaft develops microscopic play, causing metal-on-metal friction that screams whenever the motor spins up.
If the sound resembles a card flapping against bicycle spokes or a harsh scraping noise, the motor itself may still be functional. Instead, frost ridges or heavy ice sheets might be encroaching into the fan shroud. As the plastic fan blades spin at thousands of revolutions per minute, they clip the edge of the frost formation.
If left unaddressed, ice contact will eventually bind the motor, burn out its stator windings, and cause fresh food temperatures to spike. For a comprehensive walkthrough on addressing freezer airflow failures, review my Is Your Fridge Warm A Step By Step Evaporator Fan Replacement Guide.
Rapid Clicking, Knocking, and Compressor Buzzing
The compressor is the heart of your refrigerator’s sealed refrigeration system. Positioned behind the bottom access panel, it pressurizes refrigerant and drives it through the heat-exchange loops. During normal operation, it emits a steady, low-frequency hum.
When a refrigerator emits a distinct, loud click, followed by a muffled hum for 3 to 10 seconds, and terminates in a sharp snap of silence, the compressor start relay or run capacitor is failing. The relay attempts to send the auxiliary electrical burst required to start the pump motor. If the relay contacts are charred or the internal PTC ceramic disc is shattered, the compressor fails to start. The overload protector then cuts power to prevent the motor from melting down, resetting a few minutes later to repeat the cycle.
A deep knocking sound that occurs precisely as the refrigerator cycles off is often caused by internal suspension wear. The electric motor inside the compressor canister is suspended on internal dampening springs. If an internal spring snaps or weakens, the motor housing recoils and bangs directly against the outer steel canister upon deceleration.
While external acoustic pads and vibration dampening can reduce external resonance—as detailed in this guide on How to Quiet Refrigerator Compressor Noise—internal mechanical clatter inside the sealed compressor shell cannot be rebuilt in a home kitchen.
Ice Maker Clatter and Water Valve Hum
Modern ice makers generate distinct operational sounds that can easily be mistaken for component failures. When the mold heater warms up to release frozen cubes, an internal motor drives ejector blades to sweep the ice out into the storage bucket, producing a noticeable mechanical scrape followed by a plastic clatter as ice drops.
A sharp, continuous buzzing sound that lasts between 5 and 15 seconds corresponds directly to the energizing of the electric water inlet valve located at the lower back of the cabinet. When the ice maker calls for water, the valve solenoid opens a diaphragm to let household water flow into the fill tube.
If your home’s water supply valve is turned off, if water pressure falls below the standard 20 to 120 PSI operational window, or if sediment blocks the inlet screen, the solenoid coil will vibrate loudly against its frame. If you encounter persistent ice production failures alongside these acoustic warning signs, reference our specialized Ice Maker Repair resources to quickly diagnose mechanical drive and valve issues.
Step 1: Pinpoint the Sound Source Accurately
Accurate troubleshooting requires isolating the specific mechanical zone creating the racket. Refrigerators contain only three primary moving assemblies: the freezer evaporator fan, the lower mechanical condenser fan, and the hermetic compressor.
Freezer Evaporator Fan vs. Condenser Fan Diagnostics
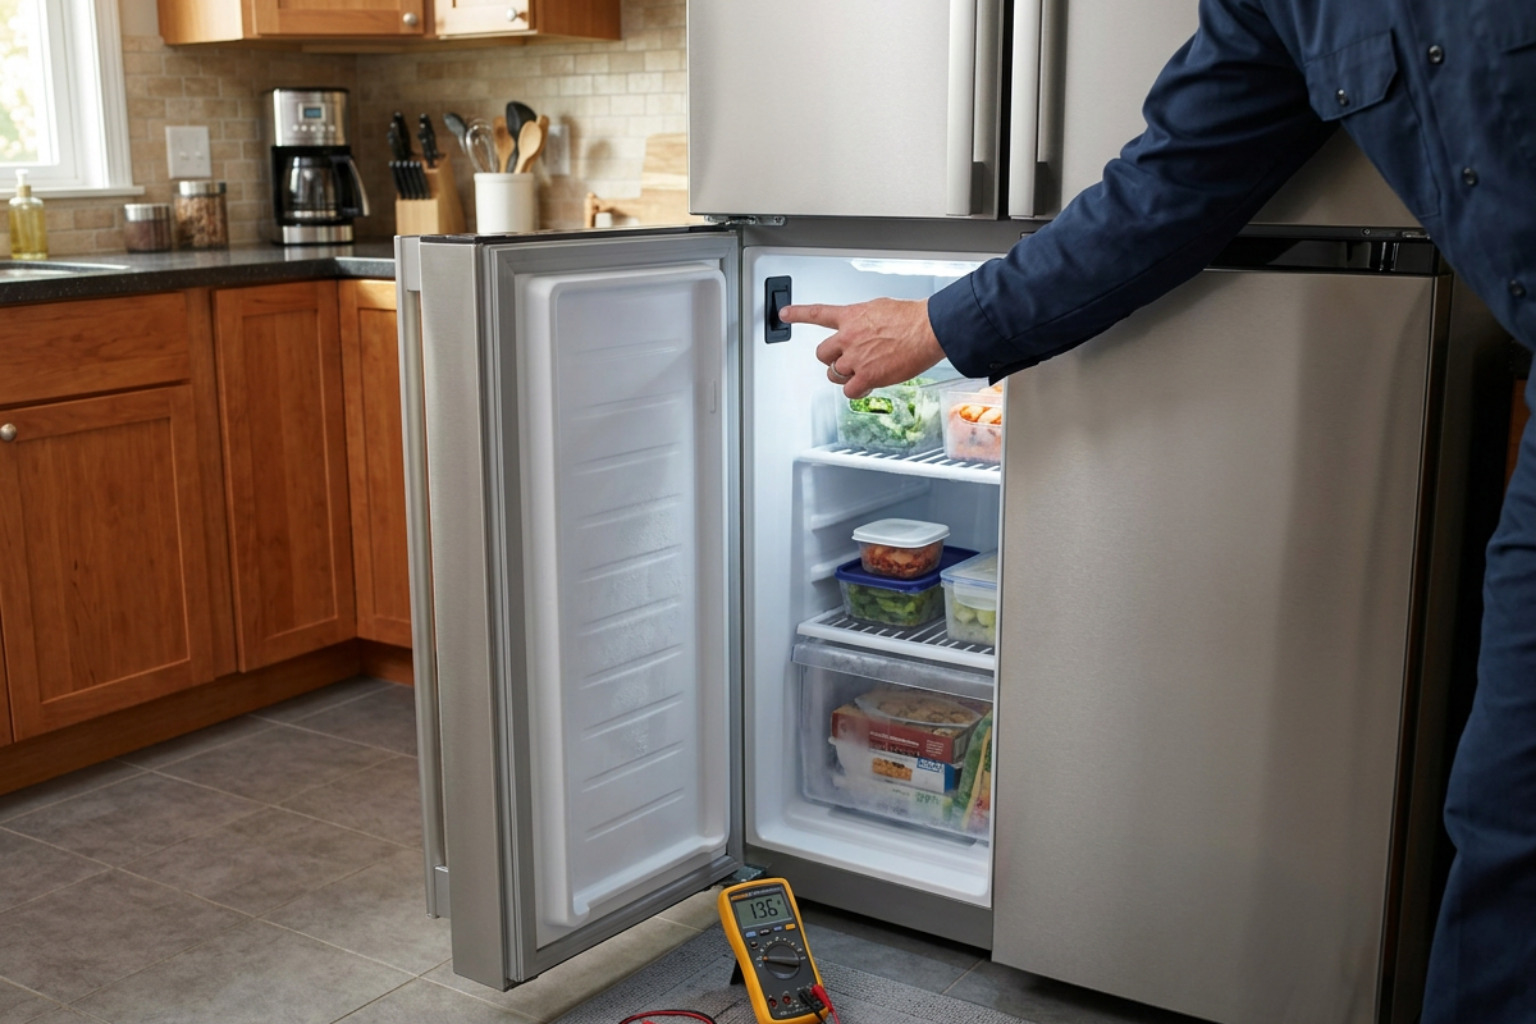
To differentiate between an evaporator fan problem and a rear machine compartment issue, perform the door-switch test:
- Walk up to the refrigerator while the loud noise is actively occurring.
- Open the freezer compartment door wide.
- Observe whether the noise stops instantly.
- Locate the mechanical plunger switch or magnetic sensor along the door frame and press it closed manually with your finger.
Modern refrigerators are engineered to cut electrical power to the internal evaporator fan when the door opens to prevent blowing chilled air directly into the kitchen. If the noise silences the exact instant you open the door, and resumes the moment you press the door switch down, the source is 100% isolated to the evaporator fan or frost rubbing the blade.
If the noise continues uninterrupted regardless of door position, pull the refrigerator forward away from the wall. Walk behind the cabinet and listen near the lower rear metal or cardboard access panel. If the noise is focused at the base, it originates from either the condenser fan motor (which cools the external coils) or the compressor. For brand-specific disassembly steps on common dual-evaporator systems, review the How to Troubleshoot a Noisy, Leaky, Icy, Samsung Refrigerator That Doesn’t Cool teardown guide.
Essential Tools for DIY Fridge Noise Repair
Diagnosing and correcting mechanical noise requires only a basic toolkit. Before beginning disassembly, gather these basic tools:
- 1/4-inch and 5/16-inch Nut Drivers: Essential for removing rear machine compartment covers and internal evaporator backplates.
- Digital Multimeter: Used to safely measure electrical continuity across start relays, defrost thermostats, and motor windings.
- Torpedo / Spirit Level: To verify front-to-back and side-to-side cabinet alignment.
- Wooden Dowel or Mechanic’s Stethoscope: Placing one end of a solid wooden dowel carefully against the compressor casing and the other against your ear acts as an acoustic amplifier, helping you distinguish between fan vibration and internal pump knocking.
- Flashlight and Inspection Mirror: To view hidden fan blades and drain passages without full component extraction.
- Hair Dryer or Hand Steamer: For melting stubborn ice banks blocking fan shrouds.
Step 2: Implement Quick Mechanical and Environmental Fixes
Many kitchen noise complaints require zero replacement parts. Simple mechanical misalignments and dust accumulations account for a substantial percentage of appliance service calls.
Leveling the Cabinet and Securing the Drain Pan
When a refrigerator is not leveled properly, the balance of internal rotational parts is compromised, and the entire steel chassis acts as an acoustic sounding board.
Place a spirit level across the top front edge of the refrigerator cabinet. Adjust the threaded leveling legs or roller adjustment screws located behind the bottom toe kick grille:
- Turn the adjustment screws clockwise with a flathead screwdriver or wrench to raise the front of the cabinet.
- Ensure the front edge sits roughly 1/4-inch to 1/2-inch higher than the rear edge. This slight backward tilt ensures doors self-close smoothly and directs condensation into the internal drain channel.
- Check the plastic condensation drain pan mounted beneath the compressor. These pans rest on slide brackets or snap mounts. Over time, plastic clips loosen, allowing the pan to vibrate violently against the compressor baseplate. Snap the pan firmly back into its retention channels or slip a small silicone dampener beneath its rim.
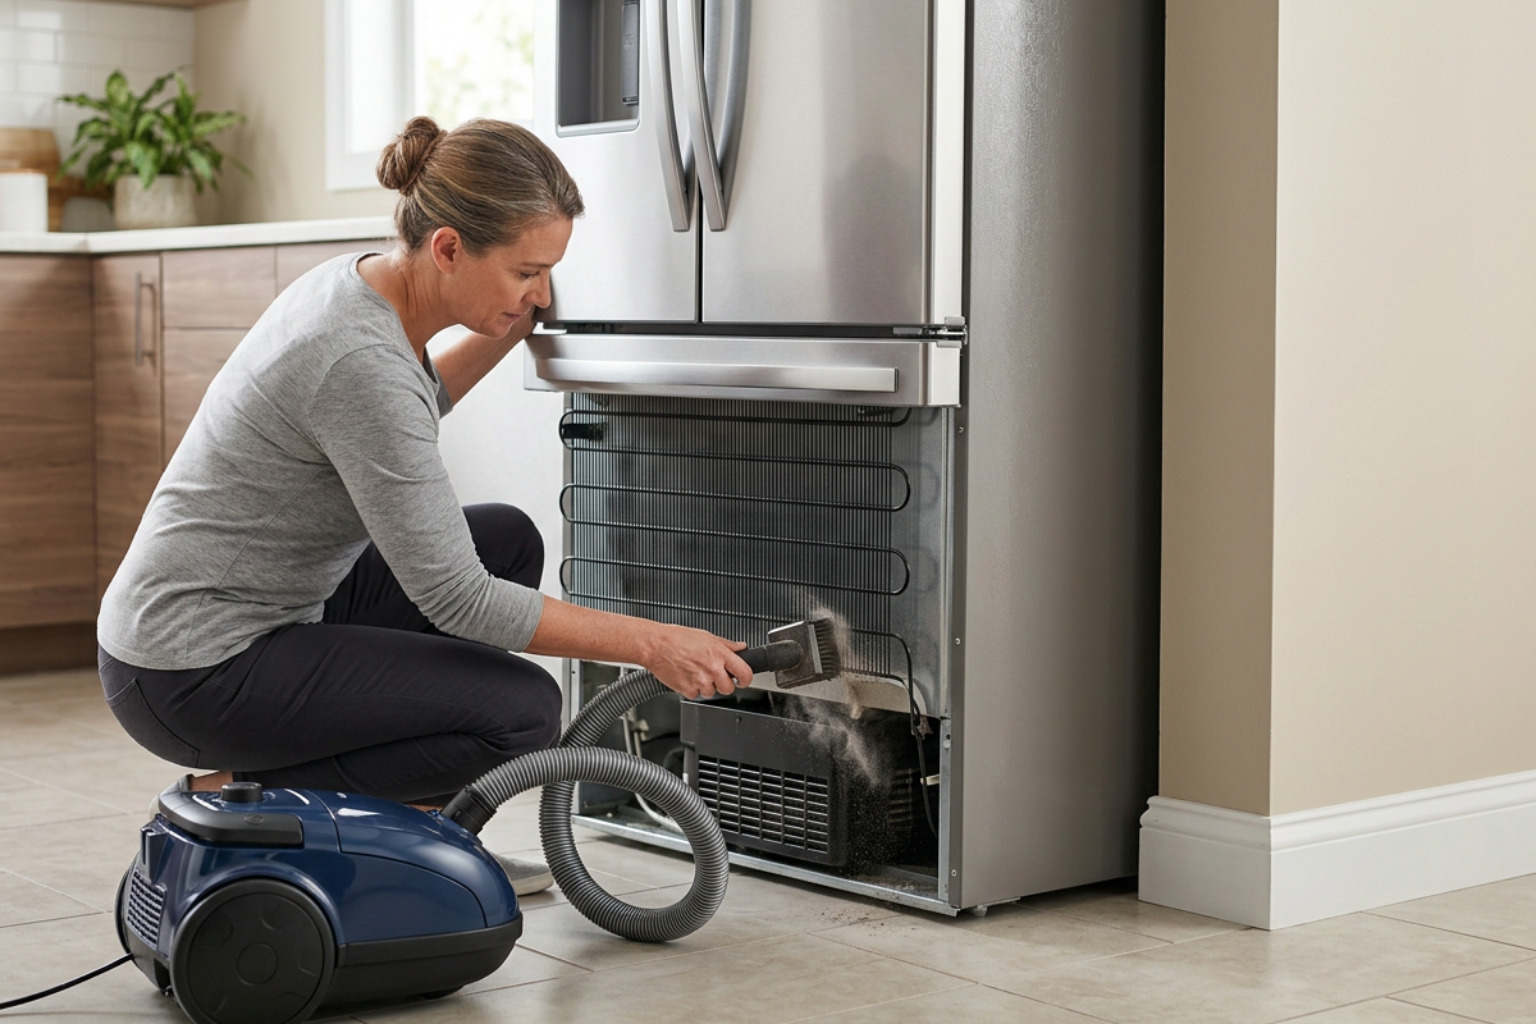
Clearing Condenser Coils and Freeing Fan Blades
Condenser coils shed heat extracted from the interior of your refrigerator. Over months of operation, pet dander, lint, and household dust blanket these coils. This airflow restriction forces the condenser fan and compressor to run hotter, longer, and at significantly higher sound output.
- Unplug the refrigerator power cord from the wall outlet.
- Remove the lower rear sheet-metal access cover using your 1/4-inch nut driver.
- Use a narrow vacuum brush attachment and a long, flexible condenser coil brush to clear dust mats off the wire matrix.
- Inspect the plastic condenser fan blades positioned adjacent to the compressor. Look for stray pieces of cardboard packaging, electrical wiring clips, or pet hair balls tangled around the motor hub.
- Spin the fan blade gently by hand. It should spin effortlessly without resistance, wobbling, or scraping against the metal shroud.
For additional context on addressing airflow blockages, you can consult this breakdown on how to fix a Whirlpool Fridge Loud? Fix Refrigerator Making Noise when rear debris creates high operational rattle.
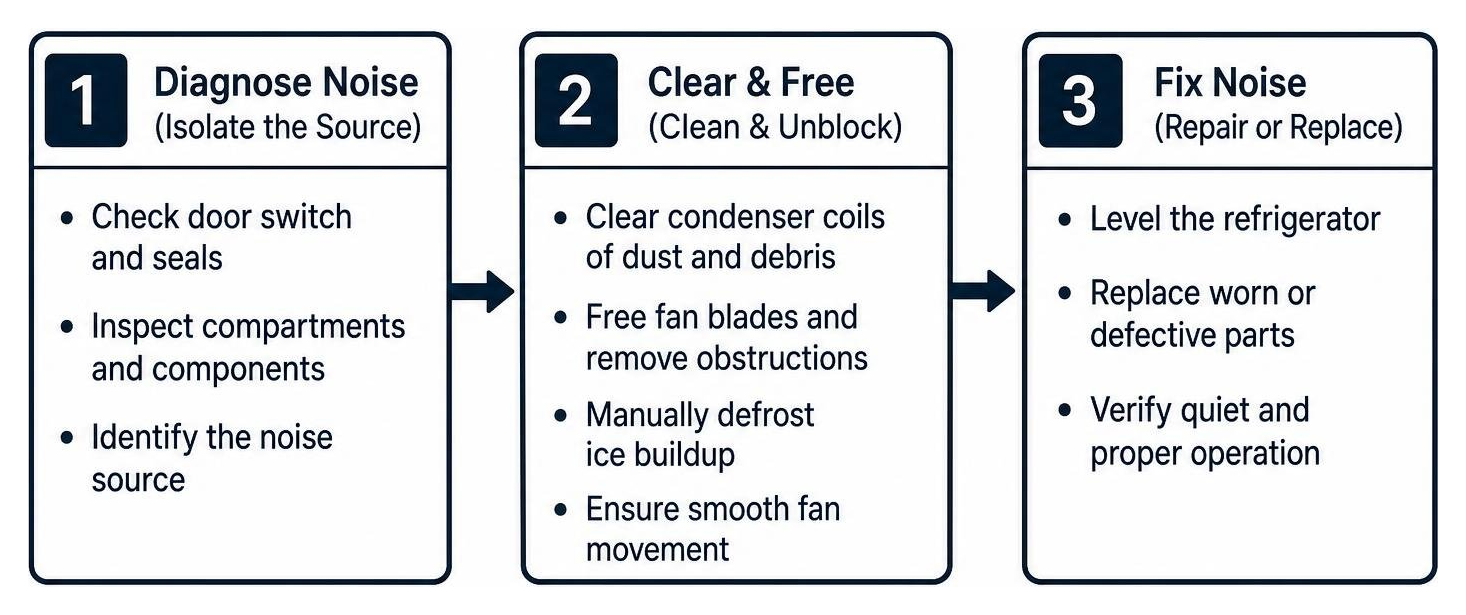
Manual Defrosting for Ice Buildup Around Evaporator Fans
If your evaporator fan makes a rhythmic scraping sound that stops when you shut off the appliance, ice has likely accumulated around the blade clearance envelope.
- Safely transfer perishable foods to an insulated cooler.
- Unplug the unit from wall power and open both the fresh food and freezer doors wide.
- Place thick towels across the freezer floor and along the kitchen floor directly beneath the door threshold.
- Allow the refrigerator to sit disconnected for a full 24 hours to melt ice encased inside internal air duct channels.
- Alternatively, remove the rear plastic interior freezer panel with a nut driver to expose the evaporator coil matrix. Use a hair dryer set strictly on medium heat—holding it at least 8 inches away from plastic liners—to melt the ice buildup. Never chip at ice with screwdrivers, ice picks, or metal knives, as puncturing an aluminum refrigerant line immediately destroys the cooling system.
- Verify that the defrost drain hole at the bottom of the coil assembly is completely clear by flushing it with hot water until it drains freely into the pan below.
Step 3: Component Replacement and Advanced Fridge Noise Repair
When mechanical cleaning and leveling fail to silence a loud appliance, internal electromechanical hardware must be systematically tested and swapped.
Replacing a Worn Evaporator or Condenser Fan Motor
A standard refrigerator fan motor features an expected operational lifespan of roughly 10 to 15 years. However, high-heat environments or unmaintained condenser coils can easily cut that duration in half. Replacement fan motors generally cost between $40 and $90, making DIY replacement highly cost-effective compared to standard professional diagnostics ($90–$150) and complete technician motor replacements ($250–$400).
To replace a failed evaporator fan motor:
- Disconnect Electrical Power: Always pull the main power plug before servicing electrical components.
- Access the Assembly: Remove the freezer shelving, ice bucket, and rear interior wall panel screws.
- Photograph the Wiring: Use your smartphone to document the exact positions of ground clips, harness plugs, and thermistor mountings before disconnecting anything.
- Extract the Motor Assembly: Unbolt the steel mounting bracket holding the motor to the rear cabinet wall. Gently pull the plastic fan blade off the central motor shaft.
- Inspect Rubber Grommets: Check the condition of the rubber vibration-isolation mounting grommets. Hardened, dried, or cracked grommets transfer raw motor hum directly into the cabinet frame. Replace them with fresh OEM rubber dampeners.
- Install New Hardware: Mount the replacement motor onto the bracket, push the fan blade firmly onto the D-shaped motor shaft, reconnect the wiring harness, and secure the interior back panel.
If your appliance displays persistent cooling imbalance across distinct zones, review our dedicated brand support protocols via our Samsung Repair Service page for specialized component schematics.
Diagnosing a Defective Compressor Start Relay
When a refrigerator compressor clicks periodically and refuses to start, testing the solid-state start relay takes under five minutes:
- Unplug the appliance and remove the rear lower metal service cover.
- Locate the small plastic housing attached directly to the three copper terminal pins on the side of the compressor.
- Gently pull the relay assembly straight off the terminal pins using a flathead screwdriver for light leverage.
- Unplug the wiring harness connectors from the relay terminals.
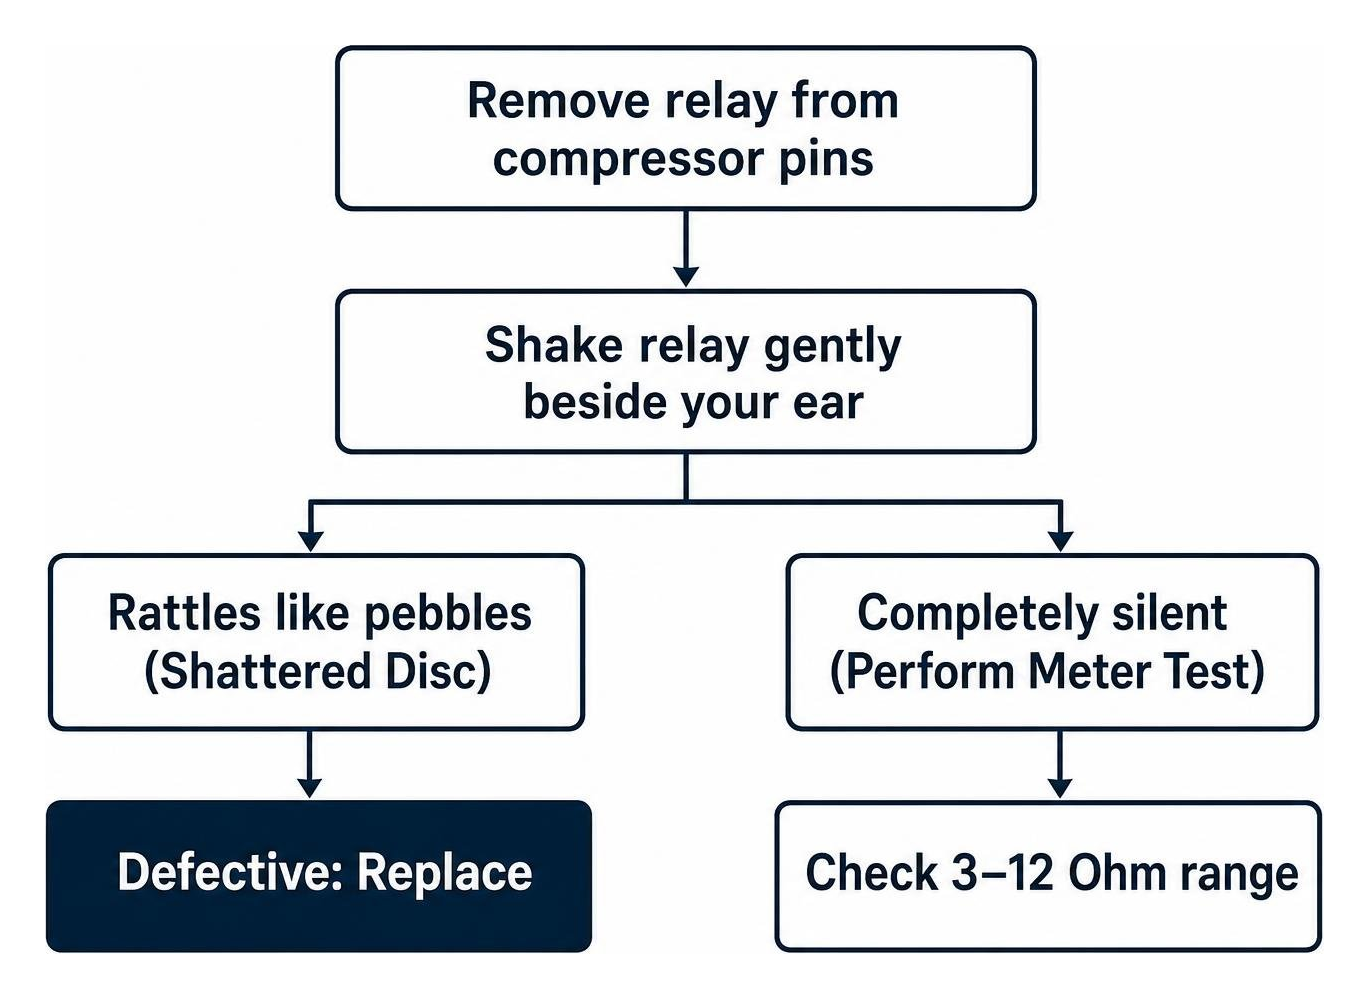
- The Shake Test: Hold the plastic start relay in your hand and shake it next to your ear. If it rattles like loose pebbles or broken ceramic glass, the internal PTC thermistor disc has shattered. The relay is defective and must be discarded.
- Multimeter Resistance Test: Set your digital multimeter to the lowest Ohms ($Omega$) scale. Place the probes across the side-by-side terminal ports of the relay. A functional solid-state relay typically reads between 3 and 12 Ohms. If the meter displays zero continuity (infinite resistance / $OL$), the part has open-circuited.
Prevention Tips to Avoid Future Fridge Noise Repair
Preserving silent kitchen operation relies on consistent maintenance habits:
- Clean Coils Semi-Annually: Vacuum the lower condenser coils every six months to prevent motor strain and compressor overheating.
- Maintain 2 Inches of Clearance: Ensure the refrigerator cabinet maintains at least 1 to 2 inches of breathing space between its rear panels, sides, and surrounding cabinetry. Cramming a unit tight against drywall creates acoustic echo chambers and traps heat.
- Inspect Door Gaskets: Wipe flexible door gaskets clean with mild soap. Warped or torn gaskets allow humid room air to infiltrate the freezer, fueling rapid ice accumulation across the evaporator fan blades.
- Avoid Food Overloading: Prevent food containers, boxes, or frozen bags from resting directly against the internal air return louvers or back freezer panels.
When to Call a Professional Technician
While fan replacements, leveling, and coil cleaning are well within reach for homeowners, certain sound profiles indicate severe failures that require advanced diagnostic tools.
You should stop DIY efforts and schedule professional service immediately under the following conditions:
- Internal Compressor Knocking: If the compressor makes a loud metallic banging noise during operation or shutdown, the internal suspension springs have failed. Sealed compressor units cannot be opened or rebuilt in the field; the entire compressor must be recovered, cut out, replaced, and brazed by an expert.
- Hissing Paired with Temperature Loss: A sustained hissing or whistling sound paired with poor cooling performance often points to a high-pressure leak in the copper or aluminum tubing. Federal law requires EPA Section 608 certification to tap, recover, recharge, and handle fluorocarbon or hydrocarbon refrigerants safely.
- Burning Odors or Scorched Terminals: Any buzzing accompanied by the smell of burning electrical insulation indicates severe motor winding damage or overheating control boards, posing a fire risk.
- Complex Multi-Zone Inverter Systems: Advanced modern French-door and counter-depth models utilize digital variable-frequency drives (VFD) and internal motorized air dampers that require diagnostic software and proprietary board-level troubleshooting.
Homeowners across the Triangle area experiencing complex compressor faults can book our certified Refrigerator Repair technicians. For emergency cooling failures or persistent vibration issues, our team delivers prompt, high-precision Fridge Repair In Raleigh Nc Fast Honest Service.
Frequently Asked Questions About Refrigerator Noise
Why does my refrigerator get quiet when I open the door?
Your refrigerator stops making noise when the door opens because the electronic control board or mechanical door switch immediately cuts power to the internal evaporator fan motor. Manufacturers program this behavior to prevent the fan from blowing cold air out into your kitchen and drawing in warm, humid ambient air.
If the loud sound cuts off instantly upon opening the door, the issue lies with the evaporator fan motor’s bearings or frost buildup on the surrounding shroud.
Is it normal for a brand-new refrigerator to make noise?
Yes, modern high-efficiency refrigerators produce different sounds than older legacy appliances. New refrigerators utilize variable-speed inverter compressors that run almost continuously at lower, energy-conserving speeds rather than cycling abruptly on and off.
Additionally, new appliances require an initial 24- to 48-hour thermal settling window during which plastic components expand, refrigerant settles, and mechanical linkages run in, producing clicking, slight gurgles, and thermal snaps. However, high-pitched squealing or harsh metal grinding is never normal on a new unit.
Can a dirty condenser coil make my refrigerator louder?
Yes. When dust, pet hair, and lint coat the condenser coils, the appliance cannot shed heat effectively. To prevent temperatures from climbing, the control board forces the condenser fan motor and compressor to operate at maximum capacity for extended cooling cycles.
This thermal strain increases mechanical vibration, amplifies motor noise, and can cause the compressor to emit an aggressive, high-decibel buzz as it struggles against excessive head pressure.
Conclusion
A noisy refrigerator is more than an annoyance—it is your kitchen appliance’s early warning system. By systematically tracking the sound to its exact location, checking cabinet level, clearing dust away from moving parts, and replacing worn fan motors or start relays early, you can prevent costly breakdowns and preserve normal food storage temperatures.
Whenever troubleshooting points to sealed refrigerant tubing, electrical board faults, or internal compressor failure, prioritize safety and professional expertise. If you need honest diagnostics and long-term repair solutions across Raleigh, Cary, Apex, Durham, or surrounding communities, connect with The Most Reliable Refrigerator Repair Service You Can Trust at iFix Appliances to restore quiet, dependable performance to your home.



0 Comments